How to Clean Stencils: Tips for Keeping Them in Tip-Top Shape
If you're a maker or artist, chances are you've used stencils at some point. While they make it easy to create intricate designs with sharp lines and crisp edges, the one downside is that they need to be cleaned after use. But how do you clean stencils? We’ll talk about why cleaning stencils after use is so important in the first place and give you tips for washing yours. Let’s start by talking about why it's necessary to clean them.
Never heard of Mesh Stencils?
These thoughtfully designed and patented Tri Mesh adhesive stencils can be combined with a variety of surfaces to create endlessly customized DIY home décor.
What you'll love:
- Create beautiful stenciled words and imagery for any occasion!
- Use over and over again on almost any surface and with almost any finish, from Rescue Restore Paint to ChalkArt and even gilding.
- New and improved design features stronger adhesive, easier cleaning, and simpler transfer between different surfaces.
Grab your favorite stencil designs and start adding artistic elements to your furniture and accents without any drawing or painting skills!
Check out all the A Makers' Studio Mesh Stencil designs here!

Do You Have To Clean Stencils After Use?
Yes! Cleaning your stencils after every use is essential for keeping them in good condition and making sure they last as long as possible. Without proper cleaning, paint, ink, or other materials can dry on the surface of your stencil, which will make it harder to remove and can result in damage over time. Additionally, dirt and debris can build up on the surface of your stencil over time if it isn't properly cleaned after each use. This can lead to an uneven application when painting or drawing with your stencil and affect the accuracy of your image. Mesh Stencils are designed to give a crisp, clean design with intricate details, so cleaning your stencils is important to maintain that design quality.
Why Do You Need to Wash Stencils?
When it comes to cleaning your stencils, there are a few different methods you can use depending on how much time you have and what mediums you're using. For example, if you don't have time to wash your stencils immediately, then submerge them in a warm water bath to keep the paint from drying in the mesh. If you're able to clean your stencil immediately – then simply running it under warm water and messaging with your fingers should do the trick. Once all the residue has been removed from both sides of the stencil, be sure to lay it flat until it's completely dry before storing it away again. For ChalkArt, Gel Art Ink, and Ceramic Paints, using your hands and lukewarm water should do the trick.
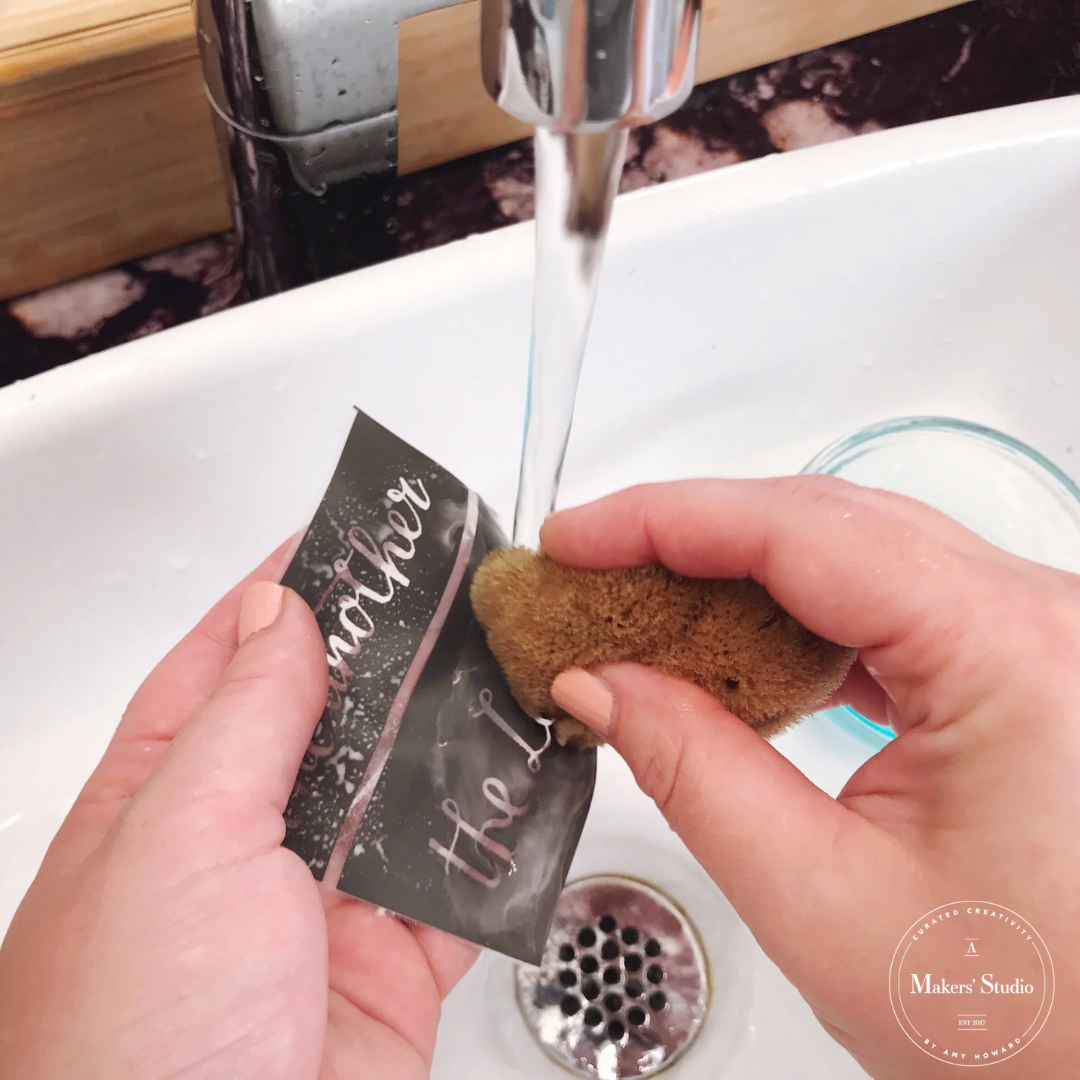
For more heavy-duty applications such as One Step Paint or Gilding Size that may require more intense scrubbing action, try using a soft (wetted) sea wool sponge along with warm water and mild dish soap (such as Dawn) to remove any stuck-on residue without damaging the surface of the stencil itself. Just be sure not to press too hard and only scrub on the non sticky side so that you don't scratch any part of the design or compromise the adhesive of the stencil!
How to Clean Mesh Stencils
Here's everything you need to know step by step:
- While using a Mesh Stencil, you will want to complete your painting within a couple of minutes in order to prevent any paint from drying in the mesh of the stencil.
- Once you're done painting, carefully peel the stencil from your surface while the paint is still wet and immediately wash the stencil in warm water, rubbing the non adhesive side in circular motions with your fingertips until the mesh is clear of paint (you may also use a sea wool sponge to gently rub out the paint on the non adhesive side of the stencil). All our mediums are designed to pair with Mesh Stencils, but if the paint is not immediately washed out with your fingertips, you may place it in a warm water bath to loosen any paint. If you are not able to immediately wash the stencil, then you may go ahead and place it in a warm water bath until ready to wash (this is the best way to clean stencils if you're pressed for time or need to finish painting elsewhere).
- Once the paint is fully removed from the mesh, place your stencil adhesive side up to air dry. Do not ever lay adhesive side down to dry.
- After the stencil dries it can be pressed lightly back onto the white card stock surface it came on and returned to the plastic sleeve.


Additional Tips for Caring for Stencils
Beyond cleaning, there are other things you should keep in mind when caring for your stencil collection: always store them flat instead of folded; never leave them out in direct sunlight; avoid leaving them exposed outdoors; make sure they're completely dry before putting them away; and wash hands thoroughly before handling them (this helps preserve their accuracy). Following these steps will ensure that your collection stays neat and tidy while also keeping the designs clean and accurate over time!
Closing Thoughts on How to Clean Stencils
Tending our tools is part of being an artist—and taking care of our supplies means our art looks better every time we create something new! For this reason, proper cleaning techniques should always form part of our creative practice - after all, well-cared-for supplies mean better results every single time! Keeping our tools in good condition is key when it comes to creating beautiful artwork with maximum accuracy every time—and this goes double for art supplies like stencil collections. Taking a few moments to properly wash and dry your tools will save you time (and money) in future! With these tips for how to clean stencils in mind, we hope that you feel confident enough now to keep yours looking their best even after multiple uses!
Happy creating!

Want to see the process of cleaning stencils? Watch this short video!
Take a look at some of these most popular themed Mesh Stencils to get started making your very own projects!
Want to Enjoy the Bragging Rights? Join our community on the Crafting a Beautiful Life Facebook page to share project photos, get inspired, and get tips and tricks from fellow crafters.
We can't wait to see how you start Crafting Your Beautiful Life!
Leave a comment